Pages

Tuesday, February 23, 2016

A Pool... Inside?


Welcome. 
What's behind those doors you ask? Well a pool of course! 


And we come to a screeching halt -what do you do with a pool inside your house?! The minute I saw it, I knew...
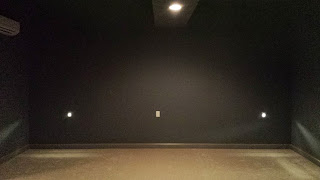
I'll convert it to living space! Better yet, a media room.


We had the floor built up about 2 feet. And the room has been prepped so that when someone buys, all they will need to do is purchase a screen & projector and GO!


I've already purchased the velvet curtains, and have a layout for the room. I wish I could justify actually putting this room together  But- to be honest, on the inexpensive end (and I'm talking, using beanbags instead of a sofa or theatre chairs) it will cost $5k. IF I went all out, we're talking $20-25K! NOT worth it - since we already DON'T go downstairs. (Which is so sad!) 
Cool fact - this rooms serves as a storm shelter. Its really hard to see from these photos, but the room is 20ft by 20ft. Its the size of my two car garage (which is located above). This room has 2 feet thick concrete walls, and metal beams holding the structure! So come on over if a tornado is in the forecast.

Evolution of a (master) bedroom

This is how our master bedroom looked when we bought the house. Ohhh, Creamy. And check those bad boys out - tinted windows. 


I had it painted before we moved in to see how it would feel. I honestly liked the room this dark with NO furniture (see below). But as you'll see, it feels small once you get the furniture in there. 


(Picture below) December of 2014 - as you can see REALLY Dark! 
I took the (Striped) curtains down eventually, because I only had 3 panels made at the time. (There is a 4th, but I just never made it! My sweet Momma made the other 3!) But still, for me something was/is missing. This color is actually a shade darker than what I have the room painted now. (The color is RH Slate).


but first, I did this...

When we bought the house, every room was wallpaper!!! We painted over all of it in every room, but this room - every night when I would go to bed, I could see lines. Everywhere!!!! 
It was like a really bad nightmare. So I spent 3 days fixing it, Brian was traveling, so I had plenty of time on my hands!


I thought about keeping the white - but Brian and I both agree, it was scary! However, it Really did help with the dark furniture issue. Unfortunately, since we just bought this furniture, less than a year before we bought the house, there was NO way I could ask Brian to let me sell it (or store it) so for at least a few more years, I'm stuck with it.

Heres the room as of today: *this is the same color as the exterior of my house. (RH graphite) Have I told you guys that before? The entire house is the same color scheme? I fell in love with Stone/Graphite/Slate. So every color in my entire house is from that palette of RH! (and if you haven't already noticed - I used the same colors at the Brentwood house as well!) 

I'm going to be honest here, not negative, just honest. -
 I don't like my master bedroom. Yes, I know (to you) it might be awesome, but to me - SOMETHING is missing. 
And maybe because of this half of the room? 
(sorry for the messy dresser)
Plus, I get bored with things really quick - so it might just be time for a color change! OR New Art! 
I know what I want this room to look like - I'm just not sure how to get to it! ** Without spending $$$$$


Thursday, February 11, 2016

Brentwood. Done.

I really appreciated, more than any of you know, that you wanted me to post pictures here! So, here are a few of the before/after collaborated - Enjoy!


What I wanted to do above, in this entry way, was put on a barn wood/sliding door frame separating the entry room from the office area....but when it got down to it, I scratched that idea and splurged for new windows throughout the entire home. This was a MUCH better plan in the long run! And for someone moving in here next, they may not have wanted that door, and for the price, I couldn't stomach that expense.

Goodbye old carpet, old fixtures, and hello beautiful hardwoods underneath! I was SO thankful to find these! 
I'm sure most of you saw this picture (above) last week - I have to admit, I was shocked at the difference of the tub - cream to white! And yes, telling you again, I reglazed the bad boy myself! took almost 5 hours to prep and scrape, and then another 3 hours the actually glaze it! Next time, I will pay someone to do this... Worth my time and effort, and highly pleased with my work, but I did NOT feel good for the next day - because of the fumes.

This room is the master, and the room I learned, ALL of the sheetrock would have to be replaced. When these shelves started coming down - the walls did right along with it. My brother actually helped us demo this room- thanks A!

Master shower, where the new shower is now, was an entire closet along the back wall... This room is huge. You'd really have to step in it, to believe it!
I have posted quite a few updates of this room along the way - I again had plans (prior to new windows) for open shelving along that back wall (above sink) - but this gives the next owner their own creativity!
A look at the dining area, red/peach color walls - updated stone walls with refinished hardwoods!

Last but not least - the worst room in the house